Jupyter Kernel Architecture
- Intro
Content
Jupyter Notebooks are a well-known parts of the scientific toolkit. They help to execute code interactively and make it easy to plot diagrams as well as to show other kinds of graphics, formulas, etc. At this moment, it has gone beyond that and you can also have different controls (e.g. input boxes, sliders, file uploaders, and so on), fully interactive charts (e.g. Plotly), or even your custom output types. That’s extremely useful in areas that highly lean on data analysis like natural or data science.
That basically made it popular. It is so popular that nowadays every major cloud providers have offerings that include hosted Jupyter Notebooks connected to their computational resources like Google Colab, AWS SageMaker Notebooks, etc.
In this article, we are going to discover how core Jupyter architecture and some interesting implementation details.
Since Jupyter universe is expanding along with Jupyter’s popularity, in this post we will start reviewing it from the bare core component which is Jupyter Kernel (using IPyKernel as an example).
Jupyter Kernels
The heart of Jupyter’s architecture is its kernel functionality. Jupyter kernel does all heavy lifting associtated with:
We have already mentioned some of the kernel functions briefly, but now let’s outline them all:
- code execution and resulting output/error propagation. This includes code that normally prompts users to type something in shell’s stdin (like Python’s input() function)
- code completion at a given cursor position
- code inspection
- code debugging
- kernel interruption on long code executions
- execution history retrieval
- some more functions around kernel’s information
While this is a complete set of kernel actions, in reality, some kernels may not support all of the functionality. For example, the R kernel is lacking support for the kernel interruption and some other things.
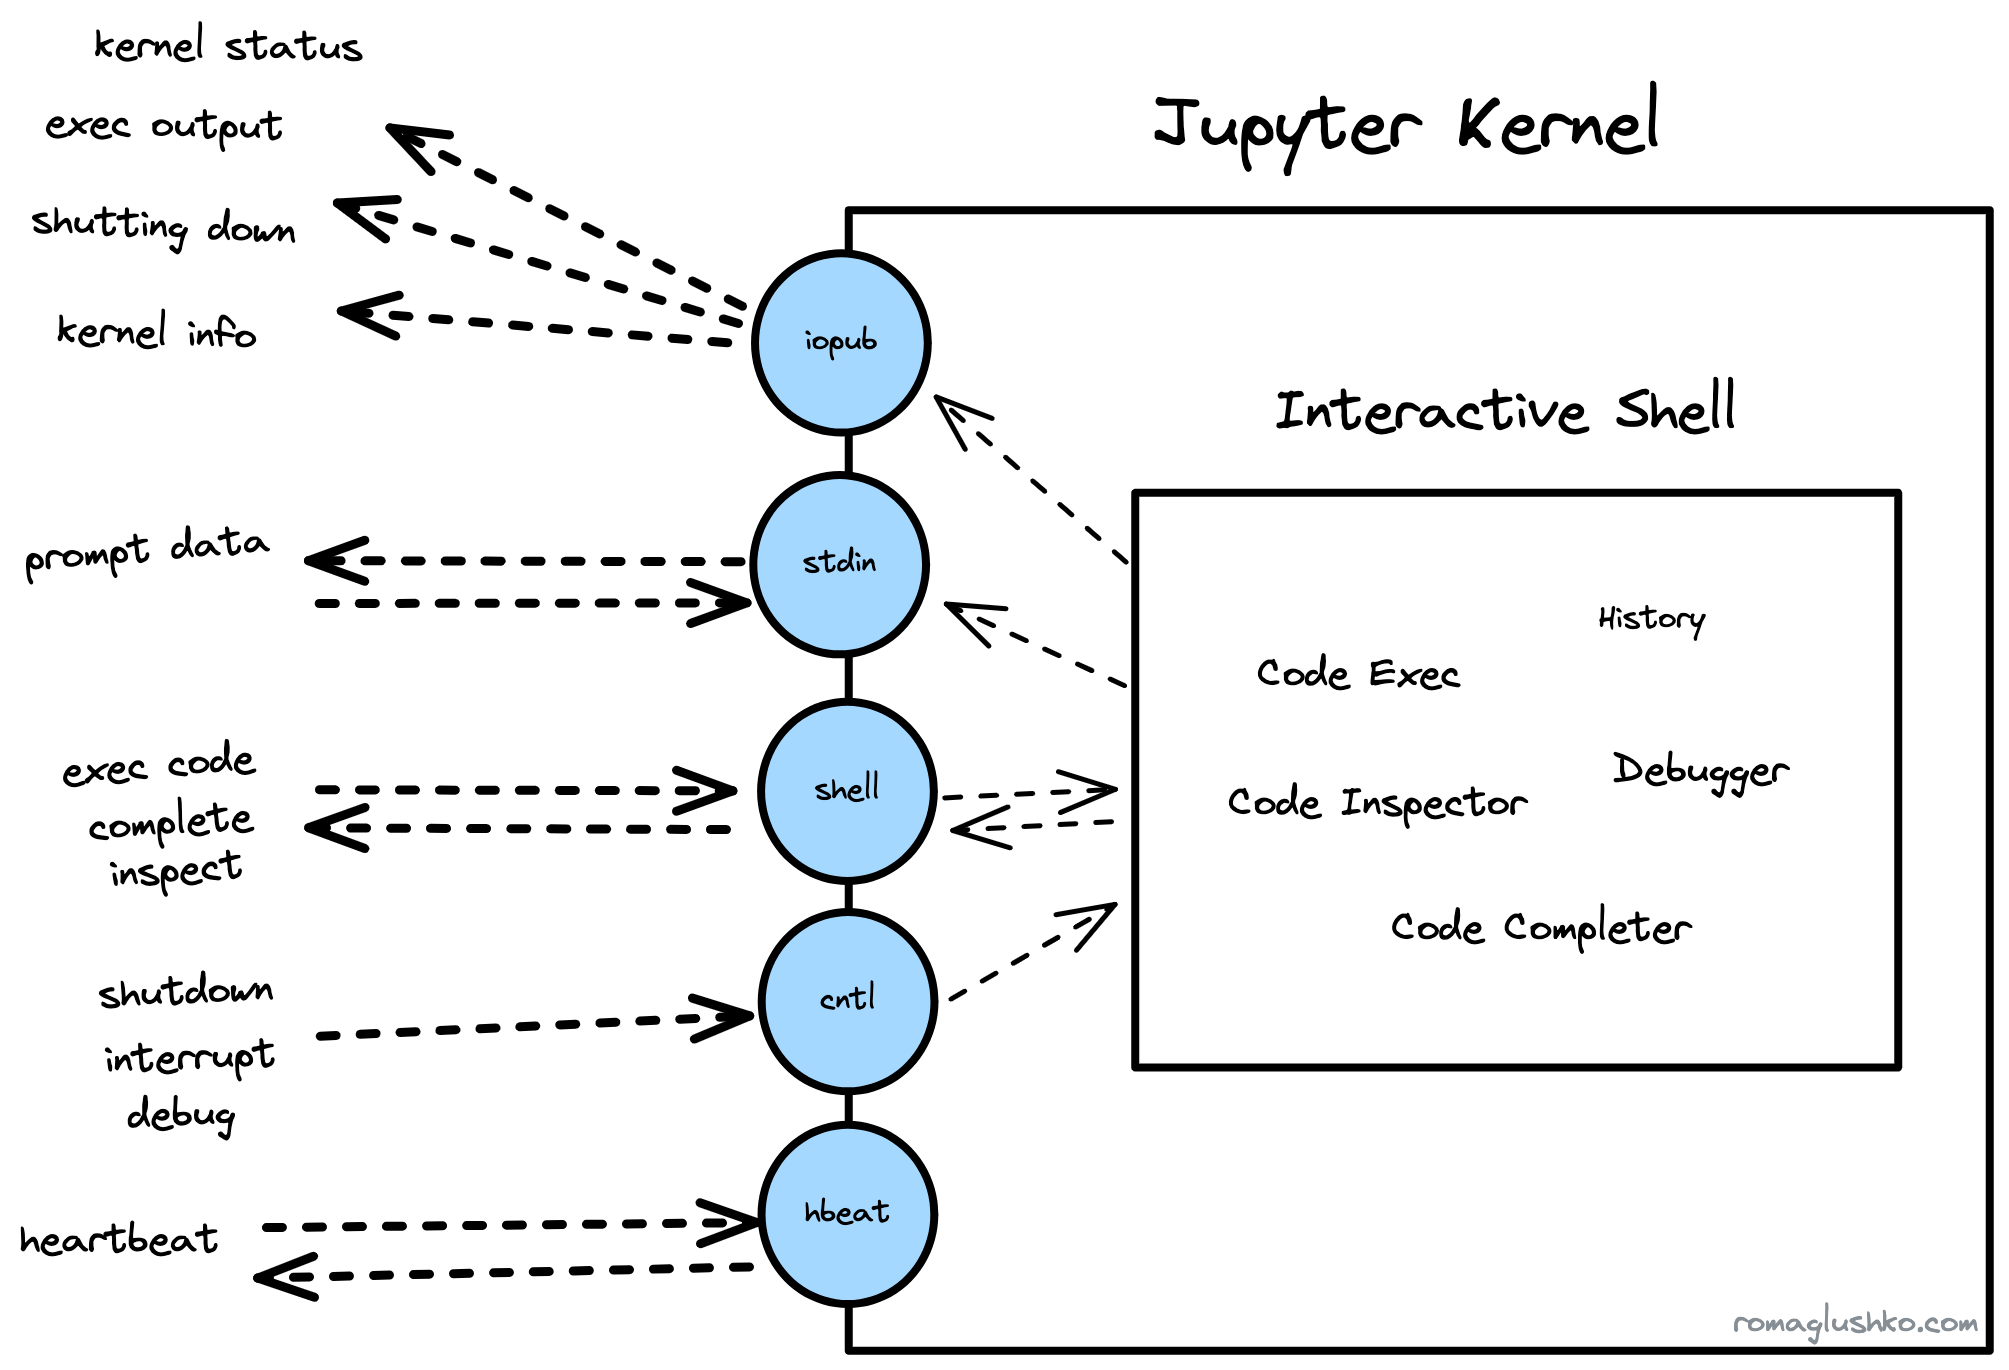
On the very basic level, Jupyter Kernel is a Unix process that binds five ports and allows to be controlled by sending messages there. The ports are bound to channels and all communication between the kernel and external world happens asynchronously via message exchange through the channels.
Jupyter Kernel Protocol

The ports are bound to ZMQ sockets that implement either REQ/REP or PUB/SUB messaging patterns depending on the channel type.
Jupyter Kernels heavily use ZMQ primitives and messaging patterns which impacted the way the kernel protocol was designed.
For example, The request-reply (e.g. REQ/REP) pattern implies that the client sends a request message that contains an action (e.g. execute code, complete code, retrieve history, etc) and then waits for the corresponding reply message from the kernel. It’s essentially an async version of RPC calls.
Here is a list of channels the kernel exposes:
- shell (REQ/REP) - a main action request/reply channel for code execution, inspection, completion, execution status, messages, etc.
- iopub (PUB/SUB) - a main broadcast channel that relays kernel status, execution output streams messages, etc.
- control (REQ/REP) - a system “privileged” channel to signal kernel shutdown, resume debugged code, interrupt code execution
- stdin (REQ/REP) - a channel for user prompt request/reply messages
- heartbeat - Another system channel that for ping-pong-like health checks
Jupyter has several separate REQ/REP channels to buffer incoming messages differently, so important messages like the kernel shutdown don’t have to wait until all previous messages were executed to take effect.
Typical Workflow
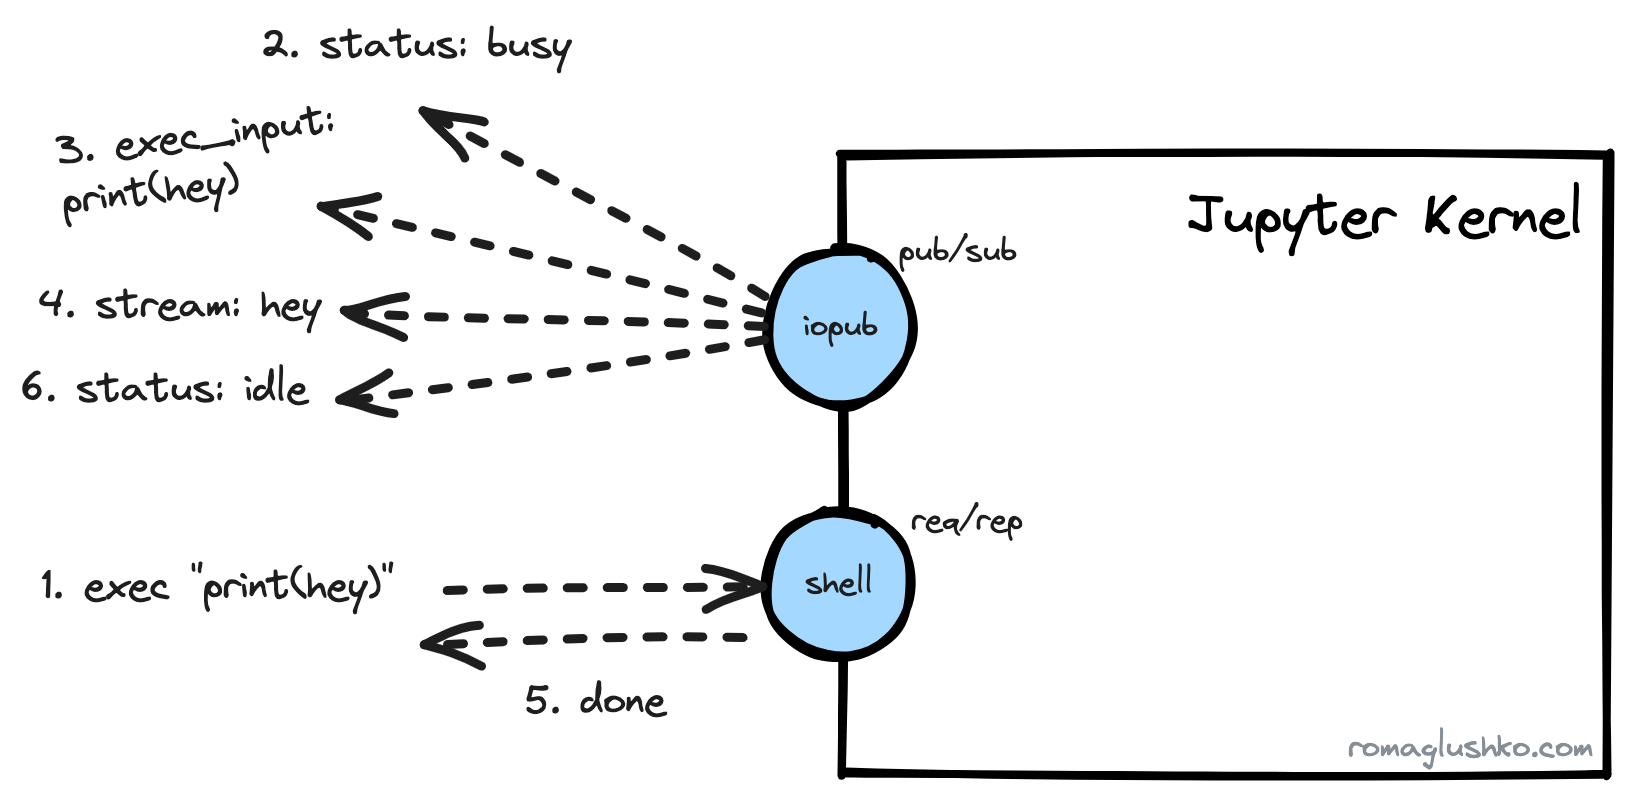
To see how the above channels play together, let’s review the code execution workflow.
When you type something like print("hey")print("hey") in a notebook cell and execute the cell, this is what happens.

First off, we need to request a code execution via the shell channel by sending a message like this:
{
  "header":{
    "msg_id":"71266d1336a9481e90f85dcfe86c5079",
    "version":"5.2",
    "msg_type":"execute_request",
    "date":"2023-08-03T13:47:27.791Z",
    "username":"roma",
    "session":"f8d6d29d3ddd4c5bbd5f72cc1b0e87bd",
  },
  "metadata":{},
  "content":{
    "code":"print(\"hey\")",
    "silent":false,
    "store_history":true,
    "user_expressions":{},
    "allow_stdin":true,
    "stop_on_error":true
  },
  "buffers":[],
  "parent_header":{},
}
{
"header":{
"msg_id":"71266d1336a9481e90f85dcfe86c5079",
"version":"5.2",
"msg_type":"execute_request",
"date":"2023-08-03T13:47:27.791Z",
"username":"roma",
"session":"f8d6d29d3ddd4c5bbd5f72cc1b0e87bd",
},
"metadata":{},
"content":{
"code":"print(\"hey\")",
"silent":false,
"store_history":true,
"user_expressions":{},
"allow_stdin":true,
"stop_on_error":true
},
"buffers":[],
"parent_header":{},
}In this message, the header.msg_type indicates the target action in the [action]_request format.
The content field contains action’s details like the exact code to execute.
Since this message inits a new code execution workflow, its header’s data is going to be attached to all related messages triggered by the workflow.
The execute_request triggers a bunch of follow-up messages and most of them are sent via the iopub channel including the actual output of the executed cell:
{
  "header": {
    "msg_id": "c80bed83-d8a85fd21dc416c2831b634a_55711_96",
    "version": "5.3",
    "msg_type": "stream",
    "date": "2023-08-03T13:47:27.799887Z",
    "username": "roma",
    "session": "c80bed83-d8a85fd21dc416c2831b634a",
  },
  "parent_header": {
    "msg_id": "71266d1336a9481e90f85dcfe86c5079",
    "version": "5.2",
    "msg_type": "execute_request",
    "date": "2023-08-03T13:47:27.791000Z",
    "username": "roma",
    "session": "f8d6d29d3ddd4c5bbd5f72cc1b0e87bd",
  },
  "msg_id": "c80bed83-d8a85fd21dc416c2831b634a_55711_96",
  "msg_type": "stream",
  "metadata": {},
  "content": {
    "name": "stdout",
    "text": "hey\n"
  },
  "buffers": []
}
{
"header": {
"msg_id": "c80bed83-d8a85fd21dc416c2831b634a_55711_96",
"version": "5.3",
"msg_type": "stream",
"date": "2023-08-03T13:47:27.799887Z",
"username": "roma",
"session": "c80bed83-d8a85fd21dc416c2831b634a",
},
"parent_header": {
"msg_id": "71266d1336a9481e90f85dcfe86c5079",
"version": "5.2",
"msg_type": "execute_request",
"date": "2023-08-03T13:47:27.791000Z",
"username": "roma",
"session": "f8d6d29d3ddd4c5bbd5f72cc1b0e87bd",
},
"msg_id": "c80bed83-d8a85fd21dc416c2831b634a_55711_96",
"msg_type": "stream",
"metadata": {},
"content": {
"name": "stdout",
"text": "hey\n"
},
"buffers": []
}The parent_header holds all information from the initial request message’s header. This way both messages are linked (it looks like stamp coupling).
The stream message type essentially means execution output stream and contains the output itself in the content.text field.
Besides this message, we receive a few more regarding the kernel status and a sign that the kernel is about to execute our code (which is useful if you execute a hell lot of cells).
Finally, the execute_reply message comes on the shell channel back holding just some summary:
{
  "header": {
    // ...
  },
  "msg_id": "c80bed83-d8a85fd21dc416c2831b634a_55711_107",
  "msg_type": "execute_reply",
  "parent_header": {
    // ...
  },
  "metadata": {
    "started": "2023-08-03T14:27:53.081090Z",
    "dependencies_met": true,
    "engine": "858ec48a-a485-41b0-a998-8c878945a732",
    "status": "ok"
  },
  "content": {
    "status": "ok",
    "execution_count": 10,
    "user_expressions": {},
    "payload": []
  },
  "buffers": []
}
{
"header": {
// ...
},
"msg_id": "c80bed83-d8a85fd21dc416c2831b634a_55711_107",
"msg_type": "execute_reply",
"parent_header": {
// ...
},
"metadata": {
"started": "2023-08-03T14:27:53.081090Z",
"dependencies_met": true,
"engine": "858ec48a-a485-41b0-a998-8c878945a732",
"status": "ok"
},
"content": {
"status": "ok",
"execution_count": 10,
"user_expressions": {},
"payload": []
},
"buffers": []
}If an error happened during the execution, the workflow would be the same, but we would receive an error message instead of the stream:
{
  "header": {
    // ...
    "msg_type": "error",
    // ...
  },
  "msg_id": "c80bed83-d8a85fd21dc416c2831b634a_55711_101",
  "msg_type": "error",
  "parent_header": {
    // ...
  },
  "metadata": {},
  "content": {
    "traceback": [
      "\u001b[0;31m---------------------------------------------------------------------------\u001b[0m",
      "\u001b[0;31mNameError\u001b[0m                                 Traceback (most recent call last)",
      "Cell \u001b[0;32mIn[9], line 1\u001b[0m\n\u001b[0;32m----> 1\u001b[0m \u001b[38;5;28mprint\u001b[39m(\u001b[43mmy_age\u001b[49m)\n",
      "\u001b[0;31mNameError\u001b[0m: name 'hey' is not defined"
    ],
    "ename": "NameError",
    "evalue": "name 'hey' is not defined"
  },
  "buffers": [],
}
{
"header": {
// ...
"msg_type": "error",
// ...
},
"msg_id": "c80bed83-d8a85fd21dc416c2831b634a_55711_101",
"msg_type": "error",
"parent_header": {
// ...
},
"metadata": {},
"content": {
"traceback": [
"\u001b[0;31m---------------------------------------------------------------------------\u001b[0m",
"\u001b[0;31mNameError\u001b[0m Traceback (most recent call last)",
"Cell \u001b[0;32mIn[9], line 1\u001b[0m\n\u001b[0;32m----> 1\u001b[0m \u001b[38;5;28mprint\u001b[39m(\u001b[43mmy_age\u001b[49m)\n",
"\u001b[0;31mNameError\u001b[0m: name 'hey' is not defined"
],
"ename": "NameError",
"evalue": "name 'hey' is not defined"
},
"buffers": [],
}Alright, enough about message joggling. Let’s zoom out a bit and see how some of the kernel actions were implemented.
Code Execution
Thinking about Jupyter’s central functionality which is code execution, we are really getting back to the project’s roots. Back then in 2011, the pure core of Python’s kernel was released as the IPython project, an interactive Python’s REPL with ✨magic. Then three years later, IPython was refactored to be used not only in the terminal but also in alternative UI like Qt- or web-based UI which became the main UI. At that time, IPython was absorbed as a part of the bigger notebook idea.
As of late, a decade later the IPython’s interactive shell is still a part of the Python’s kernel. In fact, the shell channel that is a gateway for all sorts of code executions in Jupyter is probably named after the interactive shell.

When the execute_request message gets into the kernel, it triggers a complex execution pipeline that we could divide into a few stages:
- Raw Code Transformation
- Code Compilation & AST Transformation
- Code Execution
Raw Code Transformation & Magic Commands
Cell code is not just a pure Python/R/Julia/etc code, it also could contain some magic directives that Jupyter borrowed from Matematica.
The magic commands look like %save (aka line magic) or %%sh (aka cell magic). There is also a way to run a shell command via !ls -lah.
Apparently, those special commands are not supported by the default interpreters, so Jupyter gets to transform the raw code to make them executable.
To transform the magic commands into executable code, Jupyter simply replaces unsupported syntax with legitimate calls to the interactive shell methods:
| Magic Command | Transformation |
|---|---|
%save | get_ipython().run_line_magic("save", ...)get_ipython().run_line_magic("save", ...) |
%%sh | get_ipython().run_cell_magic("sh", ...)get_ipython().run_cell_magic("sh", ...) |
!ls -ls | get_ipython().system("ls -ls")get_ipython().system("ls -ls") |
?? | get_ipython().show_usage()get_ipython().show_usage() |
get_ipython()get_ipython() is nothing else but the reference to the interactive shell and its public API via user namespace setup.
Another transformation Jupyter does is on the AST level. Jupyter compiles the cell code into an AST tree (basically, using the codeop.Compiler) and then run AST transformers against it. This is a plug-in point to further transform or reject the given code.
Eval & User Namespace
Finally, the code is ready for execution.
Jupyter leverages built-in eval() and exec() functions for that. They provide a way to setup, isolate or restrict the scope in which user code is going to be executed. Jupyter calls it a user namespace.
The user namespace consists of two types: local and global one. Jupyter cares about both of them, however, by default, they are the same. Theoretically, they could be different in some sort of embedded environments.
Jupyter creates a new Python module in which the code is going to be executed and then defines the user namespace which is essentially a dictdict with all references available to the user code:
import builtins as builtin_mod
import types


builtin_mod.__dict__['__IPYTHON__'] = True
# ...

user_module = types.ModuleType(
  "__main__",
  doc="Automatically created module for IPython interactive environment"
)

# setup references
user_module.__dict__['get_ipython'] = self.get_ipython
# ...
# http://mail.python.org/pipermail/python-dev/2001-April/014068.html
user_module.__dict__.setdefault('__builtin__', builtin_mod)
user_module.__dict__.setdefault('__builtins__', builtin_mod)

# user_module.__dict__ is the user namespace
eval("print(hey)", globals=user_module.__dict__, locals=user_module.__dict__)import builtins as builtin_mod
import types
builtin_mod.__dict__['__IPYTHON__'] = True
# ...
user_module = types.ModuleType(
"__main__",
doc="Automatically created module for IPython interactive environment"
)
# setup references
user_module.__dict__['get_ipython'] = self.get_ipython
# ...
# http://mail.python.org/pipermail/python-dev/2001-April/014068.html
user_module.__dict__.setdefault('__builtin__', builtin_mod)
user_module.__dict__.setdefault('__builtins__', builtin_mod)
# user_module.__dict__ is the user namespace
eval("print(hey)", globals=user_module.__dict__, locals=user_module.__dict__)At the user namespace creation time, the interactive shell configures bare minimal references including a reference to itself in a form of the get_ipython() function.
The shell also adds references to __builtin__ and __builtins__ modules.
These references lead to builtins imported and modified by the shell (e.g. the __IPYTHON____IPYTHON__ flag is added which is a good way to find out if you are being executed in a jupyter kernel).
It’s worth pointing out that the kernel also modifies input() and getpass() functions, but more about that in the following sections.
Ultimately, a clean user namespace looks like this:
{
  '__name__': '__main__',
  '__doc__': 'Automatically created module for IPython interactive environment',
  '__package__': None,
  '__loader__': None,
  '__spec__': None,
  '__builtin__': <module 'builtins' (built-in)>,
  '__builtins__': <module 'builtins' (built-in)>,
  '_ih': ['', 'locals()'],
  '_oh': {},
  '_dh': [PosixPath('/Users/roman/Projects/etc/jupyter-architecture')],
  'In': ['', 'locals()'],
  'Out': {},
  'get_ipython': <bound method InteractiveShell.get_ipython of <ipykernel.zmqshell.ZMQInteractiveShell object at 0x112bb5190>>,
  'exit': <IPython.core.autocall.ZMQExitAutocall at 0x112bb96d0>,
  'quit': <IPython.core.autocall.ZMQExitAutocall at 0x112bb96d0>,
  'open': <function io.open(file, mode='r', buffering=-1, encoding=None, errors=None, newline=None, closefd=True, opener=None)>,
  '_': '',
  '__': '',
  '___': '',
  '_i': '',
  '_ii': '',
  '_iii': '',
  '_i1': 'locals()'
}
{
'__name__': '__main__',
'__doc__': 'Automatically created module for IPython interactive environment',
'__package__': None,
'__loader__': None,
'__spec__': None,
'__builtin__': <module 'builtins' (built-in)>,
'__builtins__': <module 'builtins' (built-in)>,
'_ih': ['', 'locals()'],
'_oh': {},
'_dh': [PosixPath('/Users/roman/Projects/etc/jupyter-architecture')],
'In': ['', 'locals()'],
'Out': {},
'get_ipython': <bound method InteractiveShell.get_ipython of <ipykernel.zmqshell.ZMQInteractiveShell object at 0x112bb5190>>,
'exit': <IPython.core.autocall.ZMQExitAutocall at 0x112bb96d0>,
'quit': <IPython.core.autocall.ZMQExitAutocall at 0x112bb96d0>,
'open': <function io.open(file, mode='r', buffering=-1, encoding=None, errors=None, newline=None, closefd=True, opener=None)>,
'_': '',
'__': '',
'___': '',
'_i': '',
'_ii': '',
'_iii': '',
'_i1': 'locals()'
}Finally, the code and its output may be stored in the kernel history. The kernel tracks the last N executions and stores related information in a SQLite database to simplify retrieval.
Autocompletion
The user namespace is also useful during code completion.
The code completion is a chain of matchers that grab information from different sources based on some completion context provided by the kernel. The context includes:
- the full cell code
- the line at which the cursor is being placed now
- the cursor position at the line
The major matcher in the pipeline is based on the Jedi library that is capable of doing autocompletion based on code static analysis and a given user namespace.
The dict key matcher can suggest keys of a dictdict, pandas.DataFramepandas.DataFrame, and numpy.ndarraynumpy.ndarray objects.
It gets the reference for the object via regexp, evaluates its value and calls the keys() method or other specific function based on that instance type. Optionally, the instance could implement the _ipython_key_completions_()_ipython_key_completions_() method to override that behavior or to integrate with a custom class.
Other than those two, there are:
- the
file matcherthat matches files and directories on the filesystem - latex and unicode char matchers
- magic command and arguments matchers
Code Inspection
The completion is built around Python’s inspect module. The Jupyter kernel finds a given object in the namespace and then collects various information about that object based on its type (like objects, functions, vars, etc):
- object type (e.g.
functionormethod,typein case of class types,type(obj).__name__type(obj).__name__in case of class instances,builtin_function_or_method, etc.) __init__()__init__()method definition and docstring- class’s base classes and subclasses
- source of the object and file where it’s defined (even it was defined in the cell)
- a string representation of class instance (what
__repr__()__repr__()returns) - a number of items in the list, chars in the string and just what
len()len()retrieves
Signature: create_user(name: str, age: int) -> __main__.User
Source:
def create_user(name: str, age: int) -> User:
    """A User factory"""
    return User(name, age)
File:      /var/folders/s1/ts3nxvl965lfts126qzdcw300000gn/T/ipykernel_19221/3934999721.py
Type: functionSignature: create_user(name: str, age: int) -> __main__.User
Source:
def create_user(name: str, age: int) -> User:
"""A User factory"""
return User(name, age)
File: /var/folders/s1/ts3nxvl965lfts126qzdcw300000gn/T/ipykernel_19221/3934999721.py
Type: functionDebugging
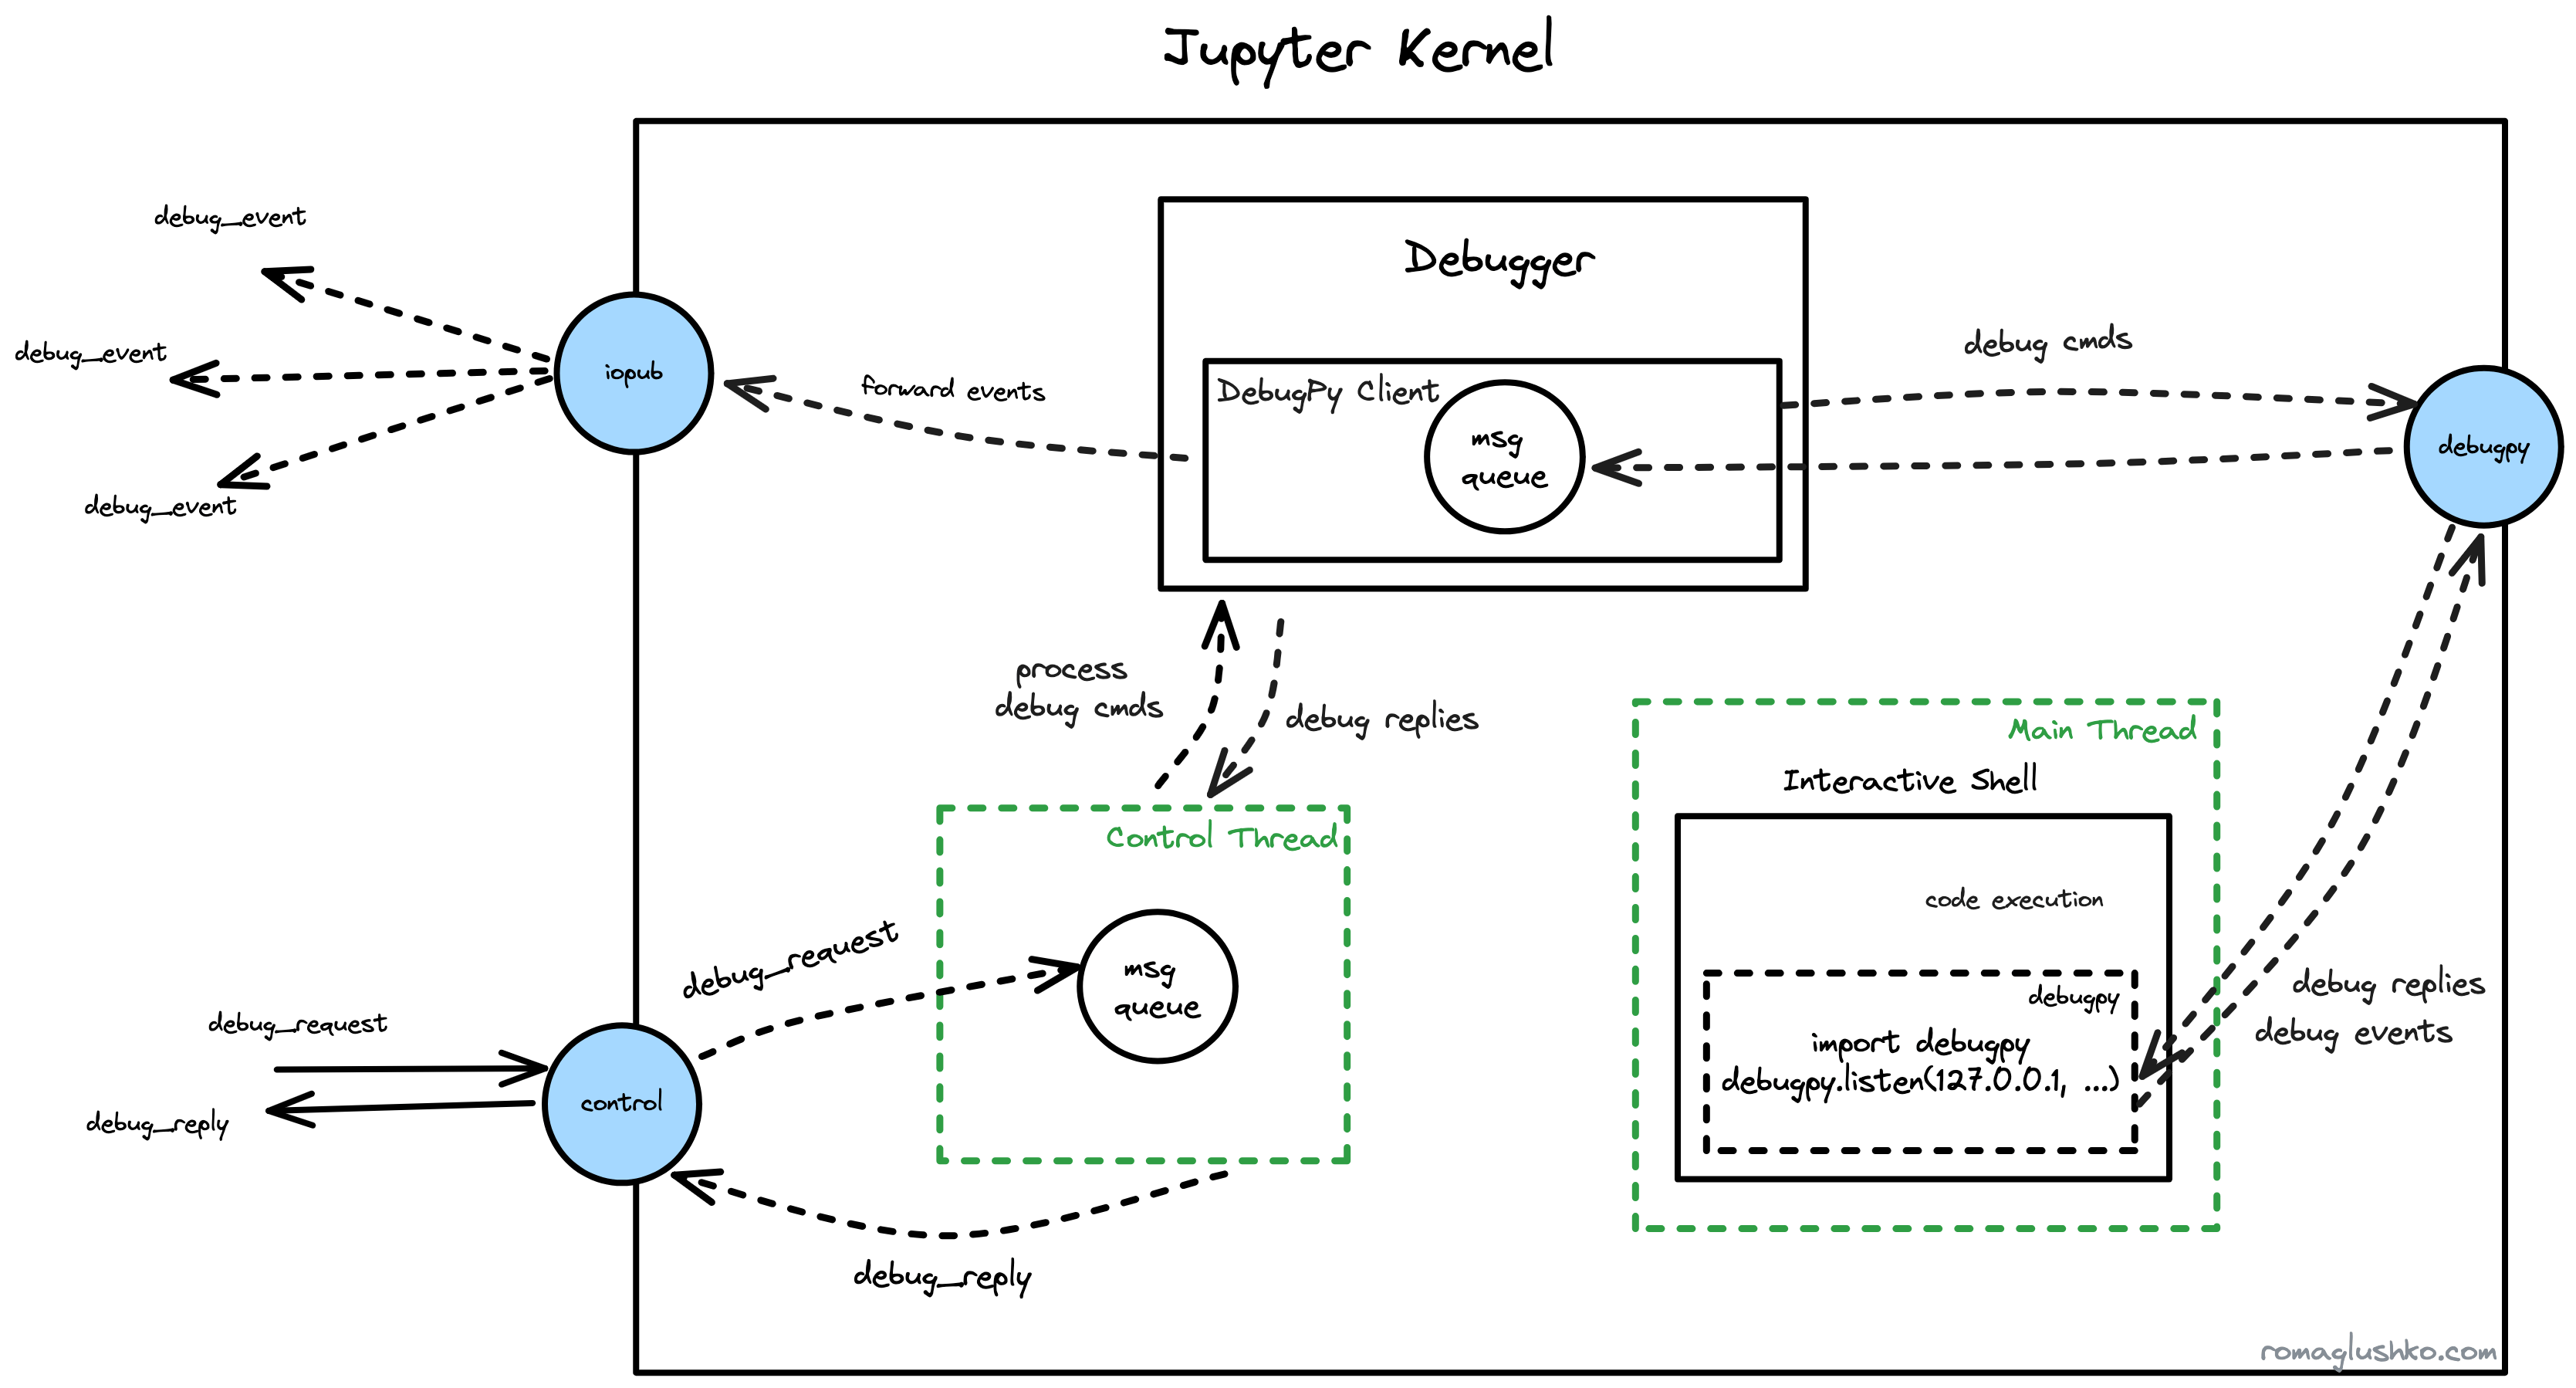
The jupyter kernel supports debugging of the cell code. In Python’s case, the corresponding kernel employs debugpy library to perform actual code debugging. DebugPy is an implementation of Microsoft’s Debug Adapter Protocol (or DAP) and Jupyter embeds it into its protocol.
We could casually dive the whole debugging workflow into three phases:
- initialization of the debugger
- breakpoint setup
- code execution with breakpoints

Debug Protocol
In all debug messages, the message format slightly deviates from the reviewed Jupyter convention. All messages still have debug_request/debug_reply types, but they are universal for all debugger commands.
The actual command is represented in the content.command property (e.g. instead of having debug_inspect_variables_request as the message type, for example).
For example:
{
  "header":{
    // ...
    "msg_type":"debug_request",
  },
  // ...
  "content": {
    "type": "request",
    "command": "inspectVariables"
  }
}
{
"header":{
// ...
"msg_type":"debug_request",
},
// ...
"content": {
"type": "request",
"command": "inspectVariables"
}
}The difference could be explained by practical considerations. To incorporate dozens of new DAP’s commands, Jupyter would need to represent all of them as new request/reply types. Debugging is just one of the features Jupyter provides, so it didn’t make sense to blow off the existing protocol with all of the requests DAP supports.
We will refer to these commands as debug_request.{command_name}debug_request.{command_name} further.
The initialization of the debugger
The client activates all debugging flows by sending a debug_request.initializedebug_request.initialize message to the control channel.
The initialization part activates debugpy right in the interactive shell (it’s in the main thread, by the way) by executing the following code:
import debugpy

debugpy.listen("127.0.0.1", {debugpy channel port})
import debugpy
debugpy.listen("127.0.0.1", {debugpy channel port}) Jupyter binds one more port for the debugpy (REQ/REP) channel which is another bi-directional ZMQ stream that serves as a communication medium between the jupyter kernel and debugpy.
Once debugpy is listening to the debugpy channel, the client then sends the debug_request.attachdebug_request.attach command to finalize the initialization phase.
The client could also send a debug_request.debugInfodebug_request.debugInfo message to get the current state of the debugger like:
- is debugger started?
- a list of breakpoints
- stopped threads
This is useful to restore the state of the UI after refreshing the page.
Configure breakpoints
debugpy is not going to change the execution workflow unless we set some breakpoints.
In most languages, there are source files that could be directly executed, so DAP’s breakpoint API works on the source file path level.
However, Jupyter notebooks are just storing executable cell code in the notebook file, but the file itself could not be executed directly by kernel’s language interpreter like Python.
That’s why Jupyter got to dump cell code into a file that debugpy could further work with.
For that, the breakpoint flow starts with a special debug_request.dumpCell request that stores the cell’s source code as a temporary file and retrieves its path in the reply.
Then, the cell source file is referenced in the debug_request.setBreakpointsdebug_request.setBreakpoints message along with breakpoint position. This is how the breakpoint gets registered on the debugpy end.
Code Debugging
Now the most riveting part.
When we send another execution_requestexecution_request message for a cell with breakpoints, Jupyter starts executing it as usual util it gets a stopped debug event.
The stopped event holds information about the reason of stopping (e.g. hitting a breakpoint) and the ID of thread that the debugger has interrupted.
At this point, we could request more content by sending:
debug_request.stackTracedebug_request.stackTraceto get the current stack trace where we have stoppeddebug_request.scopesdebug_request.scopesto get IDs ofglobalandlocalscopesdebug_request.variablesdebug_request.variablesto get the list of variables and their content by the scope ID
debugpy really suspends the thread. Since the code execution happens in the main kernel thread, Jupyter runs processing of the control channel’s messages in a separate control thread. Otherwise, the kernel would hang up forever.
To keep executing the notebook, we could send various debug commands like nextnext, continuecontinue and so on which is the same set of commands we see when debugging some code in a regular IDE. The code execution will go on until the next stopped event.
Finally, we could stop the debugger by sending debug_request.disconnectdebug_request.disconnect command.
Virtual Inputs
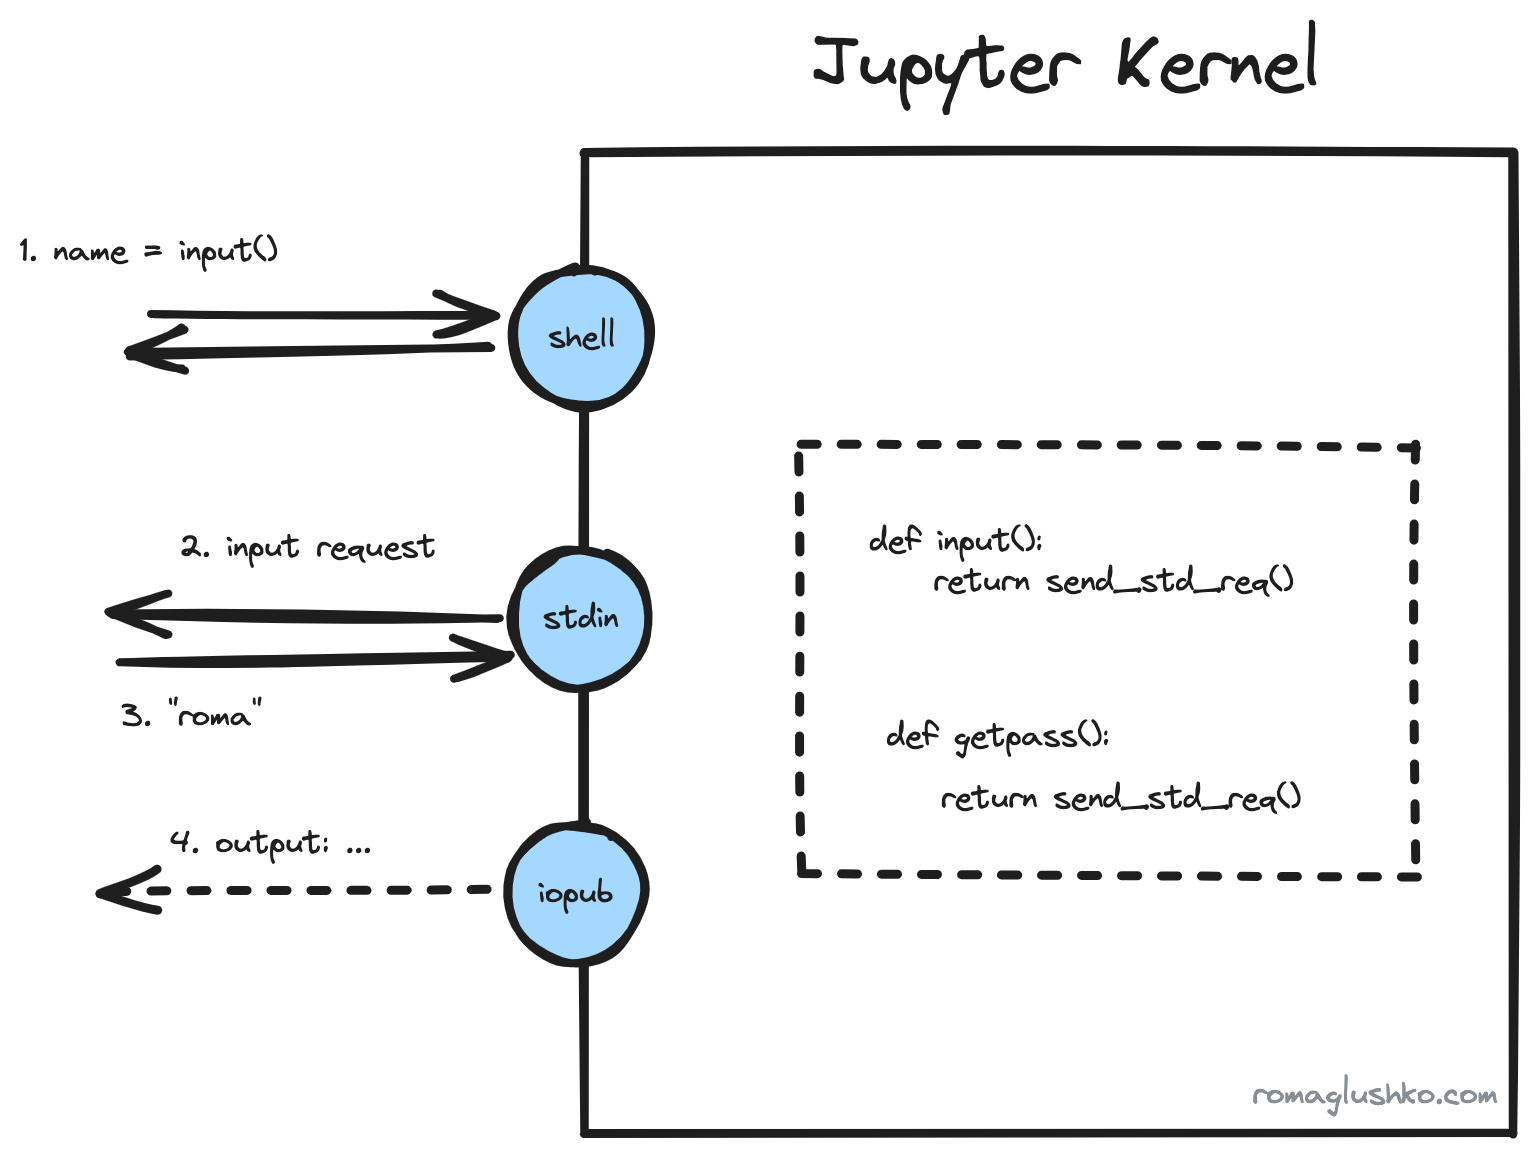
Yet another interesting workflow is input handling. Normally, when the interpreter sees calls to input()input() or getpass()getpass() functions, it prompts the user to input something using the keyboard in runtime. This is not possible in the Jupyter kernel’s case, since code execution is abstracted away.
To cope with this problem, Jupyter simply replaces (or monkey patches) implementations of the functions with its own ones before executing any user’s code. Jupyter is already controls the content of builtins module which is important to achieve that.
The new functions just send a request message to the stdin channel and wait for the reply with the corresponding user input. After that, code execution goes as it would.

This is how Jupyter implements virtual keyboard.
Jupyter Client and Gateway
That was a review of Jupyter kernel and how it works.
You may notice that usage of ZMQ and binding five channels could mean a lot of implementation details exposed by most of potential Jupyter kernel consumers. That’s why Jupyter provides a client library that further simplifies spawning and usage of Jupyter kernels.
Furthermore, some people manage and use Jupyter kernels via Jupyter Kernle Gateway which exposes kernels via HTTP/Websocket API which is more convenient and popular than the ZMQ protocol. This is also a way to access Jupyter kernels in a headless way. Although, this gateway is only capable of spawning local instances of kernels.
To be Continued
In this article, we have briefly reviewed all major architectural and implementation specifics of Jupyter kernels.
The Jupyter kernel is the heart of the Jupyter stack, but it’s only one component out of many Jupyter projects (e.g. Jupyter Server, JupyterLab, JupyterHub, Jupyter Enterprise Gateway). I hope to get to reviewing others in the follow-up articles.
Follow me on LinkedIn to get notified when sequels are ready!
